Sunday, December 29, 2013

How to assign Role to a User with Liferay Portal Client

Assigning regular role

RoleServiceSoapServiceLocator locator = new RoleServiceSoapServiceLocator();

RoleServiceSoap service = locator.getPortal_RoleService(new URL("http://username:password@localhost:8080/api/secure/axis/Portal_RoleService"));

service.addUserRoles(userId, roleIds);

Assigning site role

UserGroupRoleServiceSoapServiceLocator locator = new UserGroupRoleServiceSoapServiceLocator();

UserGroupRoleServiceSoap service = locator.getPortal_UserGroupRoleService(new URL("http://username:password@localhost:8080/api/secure/axis/Portal_UserGroupRoleService"));

service.addUserGroupRoles(userId, siteId, roleIds);


Done!!

Thursday, December 26, 2013

How to import .lar file

Liferay content (pages, child pages, portlets, permissions) could be backup and then restore.

1. Go to > Control Panel > Portal > Sites

Monday, December 23, 2013

How to export/backup Site pages as .lar file

Say for example, I have a site in Liferay called "My New Site".
In this site, I created many pages, child pages, etc.
and also put in all my portlets into all these pages,
and also permissions for all the pages, and portlets.

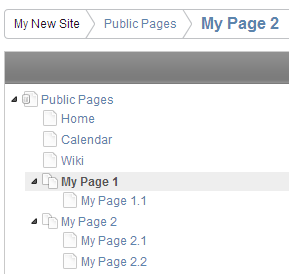
Below is my site pages hierarchy.

Friday, December 20, 2013

Date Format with <p:calendar />

There are 2 ways to define date format for <p:calendar />
1. locale
2. pattern

Option 1: locale

Simply pass in the desired locale.
<p:calendar
    value="#{bean.dateValue}"
    locale="en_US" />

available locales could be found at LocalePlanet.


Option 2: pattern


passed in desired date pattern
<p:calendar
    value="#{bean.dateValue}"
    pattern="dd/MM/yyyy" />

some sample java date patterns
PatternOutput
dd/MM/yyyy20/12/2013
dd/MM/yy20/12/13
d/M/yyyy20/12/2013
d/M/yy20/12/13
dd/MMM/yyyy20/Dec/2013
dd-MM-yyyy20-12-2013
MMM d, yyyyDec 20, 2013
yyyy/MM/dd2013/12/20
EEE, dd MMM yyyyFri, 20 Dec 2013
EEE, dd/MMM/yyyyFri, 20/Dec/2013

more java date pattern could be tested at Online SimpleDateFormat Test.


Done!!

Tuesday, December 17, 2013

HTML5 support in <p:inputText /> with "type" attribute

There is a type attribute in <p:inputText /> component.
And there are few options for the type, which is text (default), number, email, color, etc.

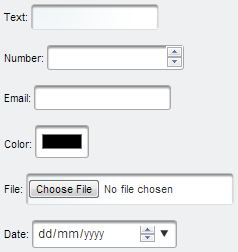
Below is the code and screenshot for different type of <p:inputText />

Text: <p:inputText type="text"></p:inputText>

Number: <p:inputText type="number"></p:inputText>

Email: <p:inputText type="email"></p:inputText>

Color: <p:inputText type="color"></p:inputText>

File: <p:inputText type="file"></p:inputText>

Date: <p:inputText type="date"></p:inputText>


Done!!

Saturday, December 14, 2013

How to update specific cell/component in dataTable

When I tried to update a specific cell or component in dataTable.
<p:commandButton id="btn"
 value="Update DataTable"
 update=":form:dataTable:0:input1" />

Hit the following Exception,
javax.faces.FacesException: Cannot find component with identifier ":form:dataTable:0:input1" referenced from "form:j_idt41:btn"

This error could be solved with jQuery selector.
<p:commandButton id="btn"
    value="Update DataTable"
    update="@(:input[id=form\\:dataTable\\:0\\:input1])" />


Done!!

Wednesday, December 11, 2013

How to add Role with Liferay Portal Client

To create Role in Liferay programmatically, one of the possible way is through Liferay Portal Client and its' web service.

Pre-requisite: Setup Liferay Portal Client
Related:
- Add Liferay user with Portal Client

1. Create Liferay service locator
RoleServiceSoapServiceLocator locator = new RoleServiceSoapServiceLocator();
RoleServiceSoap roleService = locator
    .getPortal_RoleService(new URL("http://" + screenName + ":"
    + password + "@" + liferay_server_ip
    + ":" + liferay_server_port + "/api/secure/axis/Portal_RoleService"));

2. Add new Liferay Role
RoleSoap newrole = roleService.addRole(
    "myRole",                                            // name,
    new String[] { "en_US", " en_GB" },                  // titleMapLanguageIds,
    new String[] { "my role name us", my role name  gb },// titleMapValues,
    new String[] { "en_US", " en_GB" },            // descriptionMapLanguageIds,
    new String[] { "us description","gb description" },  // descriptionMapValues,
    1);        // role type. 1=regular, 2=site, 3=organization

3. verify created role
    i) login as Liferay Administrator
   ii) Goto > Control Panel > Portal > Roles
  iii) Check whether new Role display is the listing.

Sunday, December 8, 2013

How to create Role in Liferay

"A role is a collection of permissions. A role can be applied to a user or group of users. It can even be applied to a Site or an Organization."

Steps to create role in Liferay:
1. Login to Liferay as Administrator.

2. Go to > Control Panel > Portal > Roles > Add

Friday, December 6, 2013

How to add User with Liferay Portal Client API

In previous post: Accessing Liferay Web Service with Liferay Portal Client demonstrated how to setup Liferay Portal Client and access available Liferay web services.
The demonstrated sample is to retrieve Liferay user.
And now is the time to show how to add a new Liferay user through Liferay Portal Client.

1. initiate the user service
UserServiceSoapServiceLocator locator = new UserServiceSoapServiceLocator();
UserServiceSoap service = locator
 .getPortal_UserService(new URL(
 "http://username:password@localhost:8080/api/secure/axis/Portal_UserService"));

2. add user to Liferay
UserSoap user = service.addUser(
 1L,                // companyId,
 false,             // autoPassword,
 password,          // password,
 confirmPassword,   // confirmPassword,
 false,             // autoScreenName,
 screenName,        // screenName,
 emailAddress,      // emailAddress,
 0L,                // facebookId,
 "",                // openId,
 null,              // locale,
 firstName,         // firstName,
 null,              // middleName,
 lastName,          // lastName,
 0,                 // prefixId,
 0,                 // suffixId,
 true,              // male,
 1,                 // birthdayMonth,
 1,                 // birthdayDay,
 1999,              // birthdayYear,
 null,              // jobTitle,
 groupIds,          // groupIds,
 organizationIds,   // organizationIds,
 roleIds,           // roleIds,
 userGroupIds,      // userGroupIds,
 false,             // sendEmail,
 new ServiceContext());

3. initial user status is no status, change the user status to ACTIVE
user = userService.updateStatus(user.getUserId(), 0);


Done!!

Tuesday, December 3, 2013

Liferay remote deployment

Remote deployment allowed Liferay Administrator to install a plugin from any machines instead of just from the server machine.

This feature has been available since Liferay 4. but removed from Liferay 6.
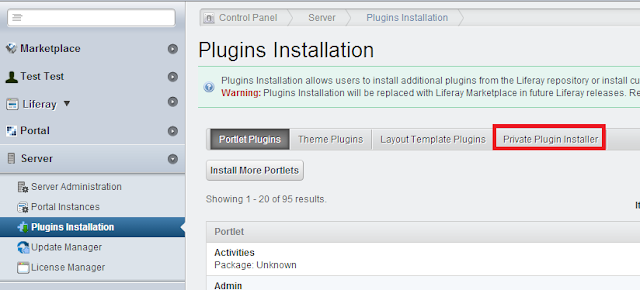
This feature could be enabled by installing the Private Plugin Installer from Liferay Marketplace.

Platform:
Liferay 6.1.1.1 CE GA2

Steps:
1. Download and install Private Plugin Installer.

2. Login to Liferay as Administrator.

3. Navigate to Plugins Installation.
    Go to > Control Panel > Server > Plugins Installation

Saturday, November 30, 2013

How to upgrade to PrimeFaces 4 from PrimeFaces 3.x

It is simple to upgrade from PrimeFaces 3.x to PrimeFaces 4.0
What need to do is only remove the primefaces-3.x.jar, then add the primefaces-4.0.jar into application lib folder.


Done!!

Wednesday, November 27, 2013

How to export database with Oracle SQL Developer

1. Open Oracle SQL Developer

2. Tools > Database Export...

3. -Browse for the export file location
    -Choose configured database connection to export
    -If wish to proceed to summary directly, then check Proceed to summary
    -Click Next

Sunday, November 24, 2013

Thursday, November 21, 2013

Adding JBoss AS7 Server Plugin in Eclipse

Add JBoss Server Runtime

1. Open Server Runtime Environments
    Window > Preferences > Server > Runtime Environments

2. Click Add to open New Server Runtime Environment dialog > Next

Monday, November 18, 2013

Portlet localization in Liferay

There is no question that Liferay portal supports localization.
But how the localization support for Portlet deployed in Liferay When locale changed?

To support localization for our own developed portlet.
1. Produce different resource bundle for different languages.
    a) By default, Portlet developed with Liferay Plugin SDK comes with a resource bundle named as Language_en_US.properties
    b) duplicate Language_en_US.properties, then rename it to suit other locale. eg, Language_in_ID.properties.

    c) replace all the bundle keys with new bundle description.

2. add the new resource bundle into liferay-hook.xml


Done!!

Friday, November 15, 2013

How to create runnable/executable jar with Eclipse

Assuming I have the following project structure in Eclipse

and following code for RunnableJarFrame.java
package test;

import javax.swing.JFrame;
import javax.swing.JLabel;

public class RunnableJarFrame extends JFrame {

 private static final long serialVersionUID = 1L;
 public static void main(String args[]) {
  new RunnableJarFrame();
 }
 RunnableJarFrame() {
  JLabel jlb = new JLabel("Runnable Test");
  add(jlb);
  this.setSize(200, 100);
  setVisible(true);
 }
}

Tuesday, November 12, 2013

How to get Liferay portlet id from URL

For users with Administrator authority, the portlet id could be retrieve from Plugins Configuration.

For users without Administrator authority, portlet id still can be retrieved from the browser URL.

Steps:
1. Click on the maximized icon of the target portlet

2. Then copy the URL from the browser address bar into a text editor, eg. notepad

3. search for the following text
    p_p_id=

    and we get the Portlet id value is 116.


Done!!

Saturday, November 9, 2013

How to get HttpServletRequest and HttpServletResponse from JSF Portlet context in Liferay

// get PortletRequest from JSF Portlet context
PortletRequest portletRequest = (PortletRequest) FacesContext
.getCurrentInstance().getExternalContext().getRequest();

// convert the PortletRequest object to HttpServletRequest object
HttpServletRequest servletRequest = PortalUtil
.getHttpServletRequest(portletRequest);


// get PortletResponse from JSF Portlet context
PortletResponse portletResponse = (PortletResponse) FacesContext
.getCurrentInstance().getExternalContext().getResponse();

// convert PortletResponse object to HttpServletResponse object
HttpServletResponse servletResponse = PortalUtil
.getHttpServletResponse(portletResponse);

Thursday, November 7, 2013

How to get HttpServletRequest and HttpServletResponse from a JSF context

// Servlet request from JSF context
HttpServletRequest request = FacesContext.getCurrentInstance()
.getExternalContext().getRequest();

// Servlet response from JSF context
HttpServletResponse response = FacesContext.getCurrentInstance()
.getExternalContext().getResponse();

Tuesday, November 5, 2013

How to get parameter's value from URL in Liferay Portlet

To get a parameter's value from URL, eg http://www.kianworknotes.com/myPage.jsp?myName=kian.
from a normal web application.
We just need to get the parameter from the request.
String myName = request.getParameter("myName");  // value is kian

But in Liferay web application, It is unable to get the parameter easily with the above code.
Because the request object in Liferay is a modified PortletRequest insted of HttpServletRequest.

Thus, the first step to request a parameter value from Liferay URL, is to convert the PortletRequest object to HttpServletRequest.
HttpServletRequest request = PortalUtil
 .getHttpServletRequest((PortletRequest) FacesContext
  .getCurrentInstance().getExternalContext().getRequest());

HttpServletRequest oriRequest = PortalUtil
  .getOriginalServletRequest(request);

Then we can get parameter's value like the above code.
String myName = oriRequest.getParameter("myName");  // value is kian

Done!!

Saturday, November 2, 2013

How to invoke action before a view is rendered

There is a new component since JSF2.0 & JSF2.1 that can invoke a listener at the defined type of JSF event.
If is <f:event />

To invoke action/listener before a view is rendered,
The type event to be used is preRenderView
and this event type is available since JSF2.1

eg,
<f:event type="preRenderView" listener="#{myBean.preRenderViewListener}" />

with the above sample code, #{myBean.preRenderViewListener} will be invoked before the view is rendered.

Wednesday, October 30, 2013

Body onload with PrimeFaces autoRun

To perform an action during page load, the normal practice is to invoke a javascript with the onload attribute in HTML body.

<html>
<head>
<script>
function load() {
alert("Page is loaded");
}
</script>
</head>
<body onload="load()">
<h1>Hello World!</h1>
</body>
</html>

With PrimeFaces <p:remoteCommand /> component, backingBean action could be called directly during page load.
by turning on the autoRun attribute to true only.
<p:remoteCommand name="testAutoRun"
    action="#{myBean.testAutoRun}"
    autoRun="true" />

The benefits with <p:remoteCommand /> are:
1. easy to use
2. No hassles to write any javascript
3. other pages are not affected (if facelets template is used)


Done!!

Sunday, October 27, 2013

How to get client id in Liferay PrimeFaces portlet

There is a convenient function in PrimeFaces to get client id of a component.
That is #{p:component('compId')}
The above function returns a full client id, eg. form:compId

But the full client id returned in Liferay portlet is not usable.
because Liferay portal is appending an unique id in front of form to make the client id unique.
eg. A8838:form:compId

Thus, the returned id is not a valid id in PrimeFaces or JSF context.

 JSTL functions could be used to solve this issue.

#{fn:substringAfter(p:component('compId')}

with the above syntax, the returned id will igore the text before the first ":"
Thus, returned id would be form:compId


Done!!

Thursday, October 24, 2013

Looping in JSF dataTable

To build a dataTable with dynamic columns in RichFaces,
we may use <c:foreach /> or <rich:columns /> in <rich:dataTable />
<rich:dataTable var="var" value="#{myBean.list}">
    <c:foreach var="column" value="#{myBean.columns}">
        <rich:column>
            <f:facet name="header">
                <h:outputLabel value="#{column.name}" />
            </f:facet>
            <h:outputLabel value="#{var[column.value]}" />
        </rich:column>
    </c:foreach>
</rich:dataTable>

But the same is not applicable in <p:dataTable />
because <ui:repeat /> and <c:foreach /> is not working in <p:dataTable />
Thus, the only solution to achieve dynamic column in <p:dataTable /> is to use <p:columns />
<p:dataTable var="var" value="#{myBean.list}">
    <p:columns var="colomn" value="#{myBean.columns}">
        <f:facet name="header">
            <h:outputLabel value="#{column.name}" />
        </f:facet>
        <h:outputLabel value="#{var[column.value]}" />
    </p:columns>
</p:dataTable>

With <c:foreach /> or <ui:repeat />, more flexibilities could be achieved.
Since they are not working in <p:dataTable />, the only way to achieve looping is <p:columns /> with less flexibilities.


Done!!

Monday, October 21, 2013

Accessing bean's property dynamically like a map

Assuming we have the following class
@ManagedBean(name="myBean")
public class MyBean {
    private String property1;
    private String property2;

    // getter and setting for property1, property2, ...
}

Normally we are accessing the properties in a bean from xhtml like syntax below.
#{myBean.property1}

But, recently found that we can actually accessing the properties of a bean like accessing a map.
#{myBean['property1']}

#{myBean['property2']}

in normally circumstances, it is nothing special from the traditional way.
But it is relatively useful if we want to dynamically access the properties in a bean.


Done!!

Friday, October 18, 2013

How to find deployed portlet id in Liferay

To find the targeted portlet id in Liferay, follow the below steps:

1. Login to Liferay portal as Administrator
    For user without Administrator rights, Portlet id could be retrieve from browser URL.

2. Navigate to Portlet Plugins
Go to > Control Panel > Portal > Plugins Configuration > Portlet Plugins


3. Click on the targeted portlet from the list, the portlet id will be shown in the details page.


Done!!

Tuesday, October 15, 2013

How to add user(s) in JBoss AS7

To add user(s) to JBoss AS7.
1. navigate to <JBoss_installation_directory>/bin

2. d-click add-user.bat in window or execute add-user.sh in Linux

3. Choose user type, either a or b

Saturday, October 12, 2013

Hacking the JBoss JNDI Datasource configuration

The previous post shows how to create the JNDI datasource connection in JBoss AS7.
There is also a quick way to hack the JBoss JNDI datasource configuration.
This allowed us to modify / create / delete the datasource connection without login to JBoss AS7 admin console.

Steps:
1. open standalone.xml in <JBoss installation directory>/standalone/configuration.

2. search for <datasources, <datasource /> between <datasources> ... </datasources> are the JNDI datasource connections available in JBoss AS7.

3. modify <datasource />
    - changing the jdbc url, username, password of the existing datasource connection.
    - create another new JNDI datasource connection
    - delete the <datasource /> that is no longer in used.


Done!!

Wednesday, October 9, 2013

How to create JNDI datasource in JBoss AS7

This post shows how to create JNDI for datasource connection in JBoss AS7.
There is another post to show how to create JNDI datasource in Oracle Weblogic

pre-requisite:

Steps:
1. login as management user in JBoss admin console

Sunday, October 6, 2013

How to deploy jdbc driver as a module in JBoss AS7

When multiple applications are using the same jdbc driver in an JBoss AS7, it is good to deploy the jdbc driver as a module instead of deploying the jdbc driver in every applications.

or we need to create JNDI datasource connection in JBoss AS7, then it is a must to deploy the jdbc driver into JBoss AS7, else JBoss AS7 is unable to create database connection to the target DB.

Steps:
1. create folder in <JBoss_AS7_installation_folder>/modules
    eg, oracle

Thursday, October 3, 2013

How to create JNDI datasource in Oracle Weblogic

This post shows how to create a JNDI datasource in Oracle Weblogic.
From security perspective, JNDI datasource is good to hide the database connection details in the application server console.
Thus only Administrator can view and change the database connection settings.

Steps:
1. navigate to weblogic console (normal http://localhost:7001/console), and login as weblogic admin to Weblogic Administration Console

Monday, September 30, 2013

How to change page layout in Liferay

As a popular Content Management System (CMS), Liferay allowed users to personalize their own page layout.

As long as the users are given required permission, they are authorized to change their workspace layout.

By default, Administrator and Power User are roles given this permission.

Steps to personalize page layout in Liferay,
1. Login to Liferay with the Administrator role or Power User role.

2. navigate to the Page Layout dialog.
    Manage > Page Layout

3. Choose preferred page layout, then click Save.


Done!!

Saturday, September 28, 2013

Creating hyperlink with JSF components

normally JSF components accept an outcome from navigation case to generate hyperlink.
eg,
<h:link value="my link" outcome="MY_OUTCOME" />

<h:commandButton value="my button" action="MY_OUTCOME" />

<h:outputLink value="MY_OUTCOME">my link</h:outputLink />

But hyperlink generated with JSF outcome is only within the same application.
That's mean hyperlink generated with JSF components are unable to navigate to other sites. eg, google.com.

This problem could be resolved by <h:outputLink /> where the value attribute also accepts an URL.
eg.
<h:outputLink value="www.google.com">
    <h:outputText value="Google" />
    <f:param name="param1" value="value1" />
    <f:param name="param2" value="value2" />
</h:outputLink>

With the above codes, the <h:outputLink /> component able to generate hyperlink to www.google.com.

<f:param /> is optional, required only when passing parameters
eg.
www.google.com?param1=value1&param2=value2


Done!!

Wednesday, September 25, 2013

How to retrieve logged in user model in JSF2 Portlet

Retrieving logged in user is essential in every system, especially for logging purpose or authentication and authorization.

Steps to retrieve Liferay Logged in user in JSF portlet:
1. get the PortletRequest from JSF context
    PortletRequest portletRequest = (PortletRequest) FacesContext                                                                 .getCurrentInstance()
                                .getExternalContext().getRequest();

2. get the logged in user id
    String userId = portletRequest .getRemoteUser();

3. get the user model with Liferay API
    User user = UserServiceUtil.getUserById(Long.valueOf(userId));


Done!!
Sunday, September 22, 2013

Setting default user role, group, and site for a user in Liferay

The objective of this post is to show how to define role, group, site for a user especially when create a new user in Liferay.

meaning when creating a new user, what are the roles/groups/sites that are given to the user, unless intentionally changes it to other role/group/site.

To set the default user's role/group/site, follow the steps below:
1. Login as Liferay administrator.

2. Navigate to Default User Assiciations
    Go to > Control Panel > Portal > Portal Settings > Users > Default User Associations

3. Enter desired settings into the textbox.
    eg. if the Power User removes from the Roles textbox, that means new users created after this would have User role only, which is a limited authority role in Liferay.
    same applicable for Sites and User Groups, once defined in the textbox, it would be the default settings for newly created users, unless purposely changes it during create users.


Done!!

Thursday, September 19, 2013

Currency formatting with <f:convertNumber />

due to internationalization, the system should system the currency based on users' chosen currency or locale.
eg,
12345678.36 in US display as 12,345,678.36
12345678.36 in Danish (Denmark) display as 12.345.678,36
12345678.36 in German (Switzerland) display as 12'345'678.36

this could be easily handled by <f:convertNumber />, otherwise we might need to write a custom converter to handle this.

with <f:convertNumber />, we just need to pass in the system locale for the conversion.
<h:outputText id="balance" value="#{user.balance}">
    <f:convertNumber type="currency" locale="#{facesContext.viewRoot.locale}" />
</h:outputText>
with the above code, system will dynamically format the text value with system provided locale.

Monday, September 16, 2013

How to configure Mail server settings in Liferay

To configure Mail server settings in Liferay,
first must login with administrator role. and then perform the following steps.

1. Navigate to Mail server settings page.
    Go to > Control Panel > Server > Server Administration > Mail

2. Enter valid incoming (POP) and outgoing (SMTP) mail server settings

3. Save


Done!!

Friday, September 13, 2013

Alignment issue on p:selectOneMenu

When <p:selectOneMenu /> aligns with other components.
It is align slightly upper than other components.

To resolve this issue.
simply put each component into each individual <td /> or a panelGrid to wrap the components.
<h:panelGrid columns="3">
  <p:inputText></p:inputText>
  <p:commandButton value="test"></p:commandButton>
  <p:selectOneMenu>
    <f:selectItem itemLabel="select" itemValue=""/>
  </p:selectOneMenu>
</h:panelGrid>

output:


Done!!

Tuesday, September 10, 2013

How to delete user(s) in Liferay

To delete user(s) in Liferay, we must login to Liferay Portal with Administrator role.

1. Navigate to Users and Organizations
    Go to > Control Panel > Portal > User and Organization

2. Choose user(s) to deactivate

3. Search all inactive user(s).
    a) Click the Search All Users link
    b) Choose Inactive in the Status dropdown
    c) Click Search

4. Choose user(s) to delete from the inactive list.


Done!!

Saturday, September 7, 2013

How to pass parameters with p:remoteCommand

In some cases, we might want to invoke an server side action via java script.
This can be done by <p:remoteCommand />.
with <p:remoteCommand />, we could assign a name to the remoteCommand component, then invoke the remoteCommand's action with the given name
<p:remoteCommand name="rcTest"
    action="#{myBean.someAction}"
    update="any_component_id" />

<p:commandButton value="remote command test" onclick="rcTest();" />

In Addition, we might want to pass in some parameters to our server side action with the following syntax.
<p:commandButton value="remote command test" 
    onclick="rcTest([{name:'myName1',value:'myValue1'},{name:'myName2',value:myValue2}]);" />

Tuesday, September 3, 2013

How to create side menu layout with p:menu

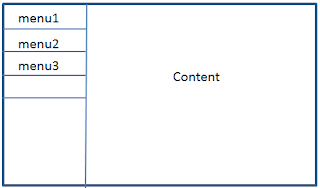
The objective of this post is to create side menu layout as below.

1. create a side menu template
<?xml version="1.0"?>
<!DOCTYPE html PUBLIC "-//W3C//DTD XHTML 1.0 Transitional//EN"
"http://www.w3.org/TR/xhtml1/DTD/xhtml1-transitional.dtd">
<html xmlns="http://www.w3.org/1999/xhtml"
 xmlns:h="http://java.sun.com/jsf/html"
 xmlns:ui="http://java.sun.com/jsf/facelets"> 

<h:head />
<h:body>
 <h:form>
        <table>
            <tr>
                <td><ui:insert name="sidemenu" /></td>
                <td><ui:insert name="content" /></td>
            </tr>
        </table>
  </h:form>
</h:body>
</html>

Sunday, September 1, 2013

How to create side menu layout with p:tabView

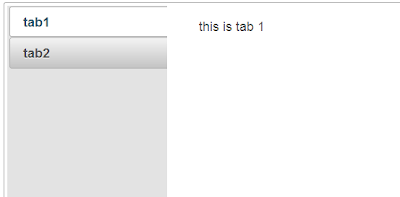
The objective of this post is to develop below layout with <p:tabView /> component.

With the tabView component, the above layout could be easily developed with the orientation attribute.
<p:tabView orientation="left">
    <p:tab title="tab1">
        <h:outputLabel value="this is tab 1" />
    </p:tab>
    <p:tab title="tab2">
        <h:outputLabel value="this is tab 2" />
    </p:tab>
</p:tabView>

output:

related topic.
How to create side menu layout with p:menu

Done!!

Saturday, August 31, 2013

How to hide Liferay's portlet border

This post is to show how to hide the Portlet border.
In certain cases, hiding the Portlet border could beautify the page especially when the page layout is single column.

Steps:
1. Login to Liferay as Administrator or Super user.

2. on any portlet, click on the Options button, then Look and Feel.

3. In the Look and Feel dialog, change the Show Borders to NO, then Save.

4. Refresh the current page.


Done!!

Wednesday, August 21, 2013

Self_Note: Weblogic remote EJB lookup string

pattern:
<remote_interface> beanRemote = (<remote_interface>) context.lookup("mappedName#qualified_name_of_businessInterface");

sample:
NumberService service = (NumberService)context.lookup("NumberCreator#coreservlets.bean.NumberService");

for the below 

package coreservlets.bean;
import javax.ejb.*;
@Stateless(mappedName="NumberCreator")
public class NumberServiceBean implements NumberService {
    public double getNumber(double range) {
        return(Math.random() * range);
    }
}

Tuesday, August 20, 2013

How to generate Alphanumeric with Apache commons-id

Instead of numeric sequence number, alphanumeric sequence may more occurrences.
Because a single number has only 10 occurrences (0-9), but a single alphanumeric sequence has 36 occurrences (0-9 + a-z).

It is a tedious work if we write our own codes to generate the alphanumeric sequence.
There is an easy way with Apache commons id.

Apache commons id is not release yet, but we can download it here.
Although using a pre-release library is not a good practice, but use only 1 class/function should be not a big issue.

Saturday, August 17, 2013

How to display meaningful element name when exception

During form validation in JSF, by default exception(s) thrown will display the element's client id. 

But that is meaningless to the system users, because the client id is not tally with the corresponding element label. 

How to open Liferay Plugins sdk in Eclipse

During Liferay development with Eclipse, it is better to open Liferay Plugin SDK in Eclipse.
Thus it is good to tick the checkbox "Open in Eclipse" when adding Liferay Plugin SDK.

But, when adding Liferay Plugins sdk into Eclipse, we might missed out the checkbox to Open the plugins in Eclipse.

Export/Import Liferay Portlet project in Eclipse

sometimes, we might want to export our portlet project to backup or share it with friends/colleagues.

The export of portlet project is straight forward. We can use the Eclipse export project as archive to achieve this purpose, for more details please refer here.

But the import is not that straight forward.


following are the steps to import a Liferay portlet project.
1. Start the Import wizard
    File > Import... > General > Archive File > Next

Tuesday, August 13, 2013

Obfuscation with yGuard and Ant

Obfuscation is the action to create source code that is difficult for human to understand.
It is very important for enterprise java applications to protect project's source code easily viewed by others.

After trying ProGuard and yGuard, found that yGuard is pretty simple compare to ProGuard.

Below are the simplest steps to obfuscate a JAR with with yGuard.
1. download yGuard here.

2. extract and locate the yguard.jar at the same folder with Ant build.xml.

3. add the following target into the Ant build file.
<target depends="pakage-jar" name="yguard">
  <taskdef name="yguard" classname="com.yworks.yguard.YGuardTask"
  classpath="yguard.jar"/>
  <yguard>
    <inoutpair in="PROJECT_NAME.jar" out="PROJECT_NAME_OBJ.jar"/>
     <shrink />
  </yguard>
</target>

change the PROJECT_NAME.jar that generated from the package-jar.
change the PROJECT_NAME_OBJ.jar to target destination.

4. more complicated example could refer yguard_ant_howto.html that comes with the yguard download.


Done!!

Friday, August 9, 2013

How to use Spring in a Liferay Portlet

This post shows how add Spring into a Liferay portlet.
In certain cases, we might need to have IoC in our existing application. eg, lookup configuration from xml.
adding Spring in our application might ease the xml lookup.

Steps:
1. add Spring jar from Liferay classpath
    a) add the following Spring libraries into an existing Liferay portlet project from Liferay Portal
    spring-aop.jar,\
    spring-asm.jar,\
    spring-beans.jar,\
    spring-context-support.jar,\
    spring-context.jar,\
    spring-core.jar,\
    spring-expression.jar,\
    spring-web.jar
    refer this post to know how to add Liferay Portal libraries into a portlet.

Sunday, August 4, 2013

Adding liferay libraries to customized portlet classpath

When developing customized portlet in Liferay, a lot of libraries might be needed, especially open-source library. eg jstl, commons-fileupload, commons-collection, etc

Some of these libraries are being used in Liferay Portal, thus we can actually reusing it.
this can reduce the memory usage and possibilities of conflict.

Prerequisites:
1. Make sure Liferay development properly setup.

How to generate javadoc with Eclipse

This post shows how to generate javadoc for projects created in Eclipse.
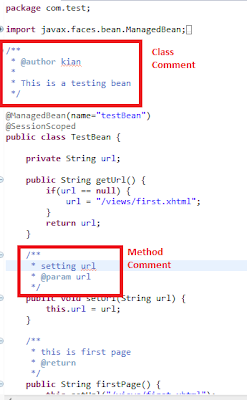
Before the javadoc could be generated, comments must be available in class level and method level.
otherwise, we can only see the class and available methods without any description.

1. insert comments
    a) key in /**
    b) press Enter
    c) insert comments inside the commented area for class and method.
creating comments for class and method

Thursday, August 1, 2013

How to quickly unlock expired Oracle database users

This post is a self note on unlocking an expired oracle database user.

OS: window

1. Open command prompt, and execute the following command
sqlplus sys/[PASSWORD] @ [SID] as sysdba

2. View expired users with the following command
Select username, account_status from dba_users where account_status like 'EXPIRED';

3. Activate user with the following command
Alter user [USERNAME] identified by [PASSWORD];


Done!!

Saturday, July 27, 2013

How to create user library in Eclipse

User library allowed us to create reusable/shared libraries in Eclipse that can be used in multiple projects within the same workspace.

Steps:

Creating a User Library

1. Go to User Libraries
Window > Preferences > Java > Build Path > User Libraries

Wednesday, July 24, 2013

Reading and writing date value in excel with Apache POI

This post shows the code snippet on how to read and write java.util.Date object to an excel.
Writing date into excel is easy; 
Reading date value from excel we must make sure the cell type is date to avoid exception.

Reading date value from excel file

Cell cell = row.getCell(i);
Date dateValue = null;
if(cell.getCellType() == cell.CELL_TYPE_NUMERIC) {
    if (DateUtil.isCellDateFormatted(cell)) {
        dateValue = cell.getDateCellValue();
    }
}

Sunday, July 21, 2013

How to access Liferay Local Service API

Other than accessing Liferay Service through web service, Liferay provides local API as well for Liferay Portlet developers to access Liferay information locally.

To know more about what local services  Liferay exposed, please refer the javadoc.

This post will show a simple example on how to access Liferay local service.

Requirement:
1. Liferay Development environment has been setup.
2. Portlet created in Liferay

Accessing Liferay Web Service with Liferay Portal Client

During development, Liferay developers might want to access to Liferay information, eg, user details.
But it is not suppose to access to Liferay database directly.
thus, Liferay exposed a list Web Services for us to access through Liferay Portal Client

Liferay's services could be accessed through local API, for more details, please refer here.

Requirement:
1. Liferay Portal 6.1.1 ga2
2. Liferay Portal Client 6.1.1 ga2
3. Eclipse Juno
4. Liferay Development environment has been setup

Wednesday, July 17, 2013

How to create multiple lines message p:tooltip

From the PrimeFaces online demo, showing the usage of <p:tooltip /> component.
But all the samples displaying only single line message.
p:tooltip demo

Sometimes, the system requirements might need to display the message in multiple lines instead of just a long single line message.

this could be achieved by putting in a <h:panelGroup /> into the <p:tooltip /> component.
Then all content could be put inside the panelGroup, eg, <p:panel />, <p:graphicImage />, etc.

Tuesday, July 16, 2013

How to assign members to a password policy

Related Liferay Password Policy topics:
  - Setting password syntax in Liferay
  - Enable Liferay password expiration
  - Enable Liferay password lockout
  - Assign members to a password policy

In Liferay, we can create multiple Password Policies for different sites, organizations, or members due to different requirements of different sites, organizations. 
certain organizations might request to have complex password format; certain organizations might simply need a login password.
So this could be handled by creating different Password Policy for different organization.

In this post, the organization MyOrg will be assigned to the newly created password policy.
All Members (MyOrgUser01, MyOrgUser02) which are under the MyOrg organization will be associate with the same password policy.

Saturday, July 13, 2013

How to enable Liferay password lockout

Related Liferay Password Policy topics:
  - Setting password syntax in Liferay
  - Enable Liferay password expiration
  - Enable Liferay password lockout
  - Assign members to a password policy

Password Lockout in Liferay refers to the locking of user account when user failed to enter the correct login id and password for the system defined number of login failures.
By default, there is no lockout for user account and user is allowed for any number of failure attempts.

In Liferay, Administrator has the options to enable the Password Lockout, and also options to unlock user account by the Administrator only or system defined duration.


Thursday, July 11, 2013

How to enable Liferay password expiration

Related Liferay Password Policy topics:
  - Setting password syntax in Liferay
  - Enable Liferay password expiration
  - Enable Liferay password lockout
  - Assign members to a password policy

Password expiration is a security consideration to force a user to change his/her password for a pre-defined duration.
eg, if the password expiration is 1 year, a user registered on 1st Jan 2013 must change his/her password on 1st Jan 2014.

The password expiration policy is built-in in Liferay but disabled by default.
From security perspective, a production Liferay portal should enable the built-in password expiration.
and below are the steps.

Sunday, July 7, 2013

Setting password syntax in Liferay

Related Liferay Password Policy topics:
  - Setting password syntax in Liferay
  - Enable Liferay password expiration
  - Enable Liferay password lockout
  - Assign members to a password policy

By default, Liferay accepts any format of password.
But it could be changed by the Administrator at any point of time.

Liferay provides an easy to configure Password Policies for Administrator to change to any desired password syntax/format.

Steps:
1. Login as Administrator

2. Navigate to Password Policies
    Go to > Control Panel > Portal > Password Policies

How to edit Liferay email notification templates

There are several pre-defined email notification templates in Liferay.
Eg. User Account created notification, Password Changed notification, etc.

As an open source CMS, Liferay allowed us to customize the notification templates with our preferences easily from the screen.

Steps:
1. Login as Administrator.

2. Navigate to Portal Settings
    Go to > Control Panel > Portal > Portal Settings

Saturday, July 6, 2013

Retrieving image from database made easy by p:graphicImage


In a Java web application, if we are going to display image(s) from database (stored in blob).
Normally it is going through an Image Servlet to convert the byte[] to an image file before render it in the screen.

With PrimeFaces's <p:graphicImage />, no additional Image Servlet is required.
What we need here is just to convert the byte[] to StreamedContent.

Converting byte[] to StreamedContent

public StreamedContent getImage() {
    byte[] imageInByteArray = IMAGE_IN_BYTE_ARRAY_FROM_DB;
    return new DefaultStreamedContent(new ByteArrayInputStream(imageInByteArray), "image/png");
}

Displaying StreamedContent in p:graphicImage

<p:graphicImage value="#{imageBean.image}" />


Done!!

Sunday, June 30, 2013

How to create database view with Oracle SQL Developer Data Modeler


In this post will show how to create database view, the creation of database view in Oracle SQL Developer Data Modeler is different with the creation of database view, and it is missing from the previous posts.

Steps:
1. Make sure the SQL Developer Data Modeler is showing the relational view.
a) click on the New View icon
b) move the cursor to the workspace (top-right pane) to bring up the View Properties dialog.
Click New View icon

Saturday, June 29, 2013

How to backup Oracle SQL Developer Data Modeler project


Once we have completed the data modeling project with Oracle SQL Developer Data Modeler, normally we will need to backup the files or future reference or it could be backup and then save it with our team members or superiors.

platform:
1. Oracle SQL Developer Data Modeler

There are 2 ways to backup the data modeling project.
1. With the "Save As..." feature of the data modeler
2. Manual

Saturday, June 22, 2013

How to programmatically append "WHERE" keyword

When querying database from program (Java, .Net, PHP, etc) with criteria (WHERE and/or AND clause), normally we will need to check the existence of WHERE or whether this is the first criteria and programmatically append the WHERE or AND keyword before search criteria..
eg.
String myQuery = "SELECT * FROM TABLE_A";
if(!myQuery.contains("WHERE")) {
    myQuery.append(" WHERE ");
} else {
    myQuery.append(" AND ");
}
// append criteria

Sunday, June 16, 2013

How to export data model to DDL with Oracle SQL Developer Data Modeler


This post will show post-action after the relational data model has been created.
The main purpose is to export the relational model as DDL, and this DDL is runnable SQL script to generate the database schema.
Besides that, it could help us to validate the correctness of data model during DDL generation.

Steps:

Saturday, June 15, 2013

How to add Sequence Generator to a table in Oracle SQL Developer Data Modeler


Nowadays, most of the database design will use a running sequence number as the table's Primary Key instead of a code column, especially for compound key to reduce the complexity to reference to the table.

Thus, this post will show how to define a Sequence Generator for a table in Oracle SQL Developer Data Modeler.

Assumed that a table already created, with a number type column as the PK shown below.
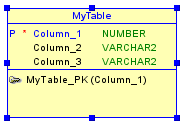
table with PK is number type

LinkWithin

Related Posts Plugin for WordPress, Blogger...