This post shows how to create a JNDI datasource in Oracle Weblogic.
From security perspective, JNDI datasource is good to hide the database connection details in the application server console.
Thus only Administrator can view and change the database connection settings.
Steps:
1. navigate to weblogic console (normal http://localhost:7001/console), and login as weblogic admin to Weblogic Administration Console

2. Click on datasources.
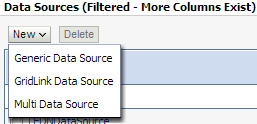
3. Click New > Generic Datasources.
4. Fill in name, JNDI name, and choose Database type, then click Next

5. Choose Database driver, then click Next > Next

6. Fill in the jdbc connection details

7. Review the connection settings and test the connection

8. Click Next if "Connection test succeeded" displayed
9. Select Target Servers then click Finish.

Done!!
From security perspective, JNDI datasource is good to hide the database connection details in the application server console.
Thus only Administrator can view and change the database connection settings.
Steps:
1. navigate to weblogic console (normal http://localhost:7001/console), and login as weblogic admin to Weblogic Administration Console

2. Click on datasources.
3. Click New > Generic Datasources.
4. Fill in name, JNDI name, and choose Database type, then click Next

5. Choose Database driver, then click Next > Next

6. Fill in the jdbc connection details

7. Review the connection settings and test the connection
8. Click Next if "Connection test succeeded" displayed
9. Select Target Servers then click Finish.
Done!!

No comments:
Post a Comment