Showing posts with label Eclipse. Show all posts

Thursday, October 26, 2017

How to transform Play project as Eclipse project

To transform a new Play project into Eclipse workspace.
the following steps can be followed.

1. navigate into the play project root directory. eg. C:\my-play-project

2. add the following plugin into the end of project/plugins.sbt

addSbtPlugin("com.typesafe.sbteclipse" % "sbteclipse-plugin" % "5.2.2")


3. add the following configuration into the end of build.sbt

EclipseKeys.preTasks := Seq(compile in Compile, compile in Test)
EclipseKeys.projectFlavor := EclipseProjectFlavor.Java  
EclipseKeys.createSrc := EclipseCreateSrc.ValueSet(EclipseCreateSrc.ManagedClasses, EclipseCreateSrc.ManagedResources) 


Saturday, December 6, 2014

How to increase JBoss Server memory and heap size when running JBoss with Eclipse Server Plugin

1. in Server view, double click on the selected configured JBoss runtime

2. click on Open launch configuration

3. in the VM arguments section, change to the desired settings

4. Click OK when finish editing the VM arguments.


Done!!

Sunday, April 13, 2014

How to increase memory and heap size in Eclipse

The default configuration in Eclipse is maximum memory 512mb, and heap size 256mb.
But that is normally not enough especially running server plugin in Eclipse, eg, Tomcat, JBoss

To run the server plugin smoothly, we need to increase the memory and heap size as below.

1. Open eclipse.ini in <Eclipse_installation_dir>

2. edit the memory and heap size to expected settings


Done!!

Saturday, March 29, 2014

How to change fonts in Eclipse

1. Open Preferences dialog
    Window > Preferences

2. Go to Colors and Fonts
    General > Appearance > Colors and Fonts

3. Choose Java > Java Editor Text Font

4. Edit

5. Choose preferred font, size, color

6. OK > OK


Done!!

Sunday, February 9, 2014

How to attach source code for a third party jar file in Eclipse

This is to make the debugging easier in Eclipse by viewing the 3rd party source and also adding break point when in debug mode.

Steps
1. R-click on selected project > Properties

2. Go to source attachment
    Java Build Path > Libraries > choose jar to attach source > Edit

Thursday, November 21, 2013

Adding JBoss AS7 Server Plugin in Eclipse

Add JBoss Server Runtime

1. Open Server Runtime Environments
    Window > Preferences > Server > Runtime Environments

2. Click Add to open New Server Runtime Environment dialog > Next

Friday, November 15, 2013

How to create runnable/executable jar with Eclipse

Assuming I have the following project structure in Eclipse

and following code for RunnableJarFrame.java
package test;

import javax.swing.JFrame;
import javax.swing.JLabel;

public class RunnableJarFrame extends JFrame {

 private static final long serialVersionUID = 1L;
 public static void main(String args[]) {
  new RunnableJarFrame();
 }
 RunnableJarFrame() {
  JLabel jlb = new JLabel("Runnable Test");
  add(jlb);
  this.setSize(200, 100);
  setVisible(true);
 }
}

Saturday, August 17, 2013

How to open Liferay Plugins sdk in Eclipse

During Liferay development with Eclipse, it is better to open Liferay Plugin SDK in Eclipse.
Thus it is good to tick the checkbox "Open in Eclipse" when adding Liferay Plugin SDK.

But, when adding Liferay Plugins sdk into Eclipse, we might missed out the checkbox to Open the plugins in Eclipse.

Export/Import Liferay Portlet project in Eclipse

sometimes, we might want to export our portlet project to backup or share it with friends/colleagues.

The export of portlet project is straight forward. We can use the Eclipse export project as archive to achieve this purpose, for more details please refer here.

But the import is not that straight forward.


following are the steps to import a Liferay portlet project.
1. Start the Import wizard
    File > Import... > General > Archive File > Next

Sunday, August 4, 2013

How to generate javadoc with Eclipse

This post shows how to generate javadoc for projects created in Eclipse.
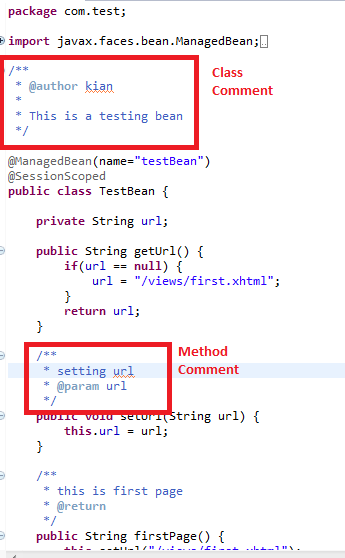
Before the javadoc could be generated, comments must be available in class level and method level.
otherwise, we can only see the class and available methods without any description.

1. insert comments
    a) key in /**
    b) press Enter
    c) insert comments inside the commented area for class and method.
creating comments for class and method

Saturday, July 27, 2013

How to create user library in Eclipse

User library allowed us to create reusable/shared libraries in Eclipse that can be used in multiple projects within the same workspace.

Steps:

Creating a User Library

1. Go to User Libraries
Window > Preferences > Java > Build Path > User Libraries

Saturday, June 1, 2013

How to add Tomcat server plugin in Eclipse

Tomcat is a popular opensource application server for java web application; Eclipse is a popular opensource  IDE for java development.
Both of them be configured to work together to increase our efficient for development.

Platform:
1. Eclipse Juno
2. Tomcat 7.x

Monday, May 13, 2013

Team Synchronization with CVS in Java Delopment

Team synchronization is very important is software development to make sure the team are working on the same stuffs and version.
at this moment, CVS is chosen to do the synchronization, more details about CVS please refer wikipedia.
The reason the title only for Java Development because Eclipse is chosen as the CVS client.

A) CVS
  1. Set up CVS sever in Linux
  2. Set up CVS ACL for access right control (coming soon)
  3. Set up CVS client with Eclipse
  4. Sharing project(s) with Eclipse
  5. Checkout project with Eclipse
  6. CVS Branching
  7. Switching CVS repository for a Eclipse workspace.
  8. Mirroring the CVS server

B) SVN
  1. Set up SVN server in Linux
  2. Set up CVS client with Eclipse
  3. Sharing project(s) with Eclipse
  4. Checkout project from SVN server with Eclipse
  5. SVN Branching

C) eGit
  1. Set up eGit server in Linux
  2. Set up eGit client with Eclipse
  3. Sharing project(s) with Eclipse
  4. Checkout project from eGit server with Eclipse
  5. eGit Branching

Done!!


How to switch CVS repository in eclipse

<< Back to CVS tutorial home

Workspace's CVS repository could be changed.
Normally due to upgrading the CVS machine or moving the CVS machine to another data center and hardware failure on the original CVS machine.

After the server migration completed or pointing to the CVS backup server due to hardware failure, configuration from CVS client is pretty simple.

Steps:
1. Window > Open Perspective > Other... > CVS Repository Exploring > OK
Choosing CVS Repository Exploring from perspective

Sunday, May 5, 2013

How to increase console line number in Eclipse

The objective of this post is to increase the line number in Eclipse console log, so that more information logged and show to us to increase the ability to debug and resolve an issue.

Steps:
1. R-click on the console area > Preferences...
eclipse console preference

2. (a) increase the line number (default 8000) if just to show all more lines console log.
    (b) Uncheck "Limit console output" if want to show all lines of console output
changing console properties

3. click "OK"


Done!!


Wednesday, May 1, 2013

How to create CVS branch with Eclipse

<< Back to CVS tutorial home

This is a tutorial to show the branching process in CVS server with Eclipse as the CVS client, and this is part Team Synchronization tutorial.

1. Window > Open perspective > Other... > CVS repository exploring > OK

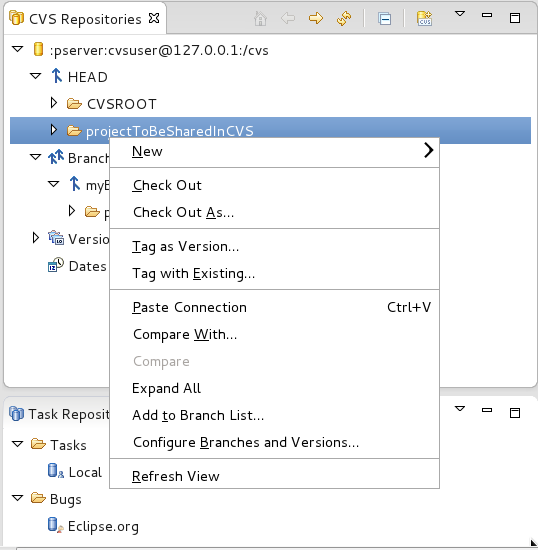
2. R-click on selected project(s) to branch > Add to branch list...
adding CVS branch

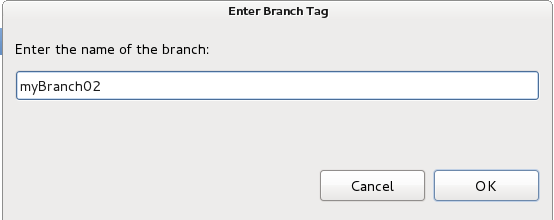
3. Enter a Branch name in the Branch Tag dialog > OK
enter new CVS branch name
    p/s: for existing branch, just copy the branch name into the text field.

Output:
new branch in CVS repository


<< Back to CVS tutorial home

Done!!


How to checkout project from CVS with Eclipse

<< Back to CVS tutorial home

This is a tutorial to show the checkout process from CVS server with Eclipse as the CVS client, and this is part Team Synchronization tutorial.

1. File > New > Project... > CVS > Projects from CVS > Next
select Projects from CVS

2. Use existing repository location, choose preferred repository > Next
choose Use existing repository location
    If there are no existing repository, choose Create a new reposity location.

3. Use an existing module, choose one or more modules > Finish, or Next to choose branch other than HEAD.
choose 1 or more project from the module list

4. Next > Next > Refresh Tags > Choose preferred Branch or Version > Finish.
Choose preferred branch or version

5. Wait for the checkout and available to use in workspace.


<< Back to CVS tutorial home

Done!!

Sunday, April 21, 2013

How to share project(s) into CVS with Eclipse

<< Back to CVS tutorial home

This article is part of the CVS Team Synchronization with Eclipse.
The objective of this article is to show how to share a new project into CVS with Eclipse.

1. Start Eclipse
2. R-click on the Eclipse that is going to share into CVS.
3. Team > Share Project...
4. Select CVS as Repository Type > Next
Choosing repository type

How to setup CVS client with Eclipse

<< Back to CVS tutorial home

This article shows how to connect to CVS server with Eclipse as the CVS client where CVS client already pre-installed in the Eclipse bundled, we just need to configure and use it.

1. Start Eclipse
2. Window > Open Perspective > Other... > CVS Repository Exploring > OK

3. Click on the Add CVS Repository icon.
CVS Repository dialog

LinkWithin

Related Posts Plugin for WordPress, Blogger...