Sunday, December 29, 2013

How to assign Role to a User with Liferay Portal Client

Assigning regular role

RoleServiceSoapServiceLocator locator = new RoleServiceSoapServiceLocator();

RoleServiceSoap service = locator.getPortal_RoleService(new URL("http://username:password@localhost:8080/api/secure/axis/Portal_RoleService"));

service.addUserRoles(userId, roleIds);

Assigning site role

UserGroupRoleServiceSoapServiceLocator locator = new UserGroupRoleServiceSoapServiceLocator();

UserGroupRoleServiceSoap service = locator.getPortal_UserGroupRoleService(new URL("http://username:password@localhost:8080/api/secure/axis/Portal_UserGroupRoleService"));

service.addUserGroupRoles(userId, siteId, roleIds);


Done!!

Thursday, December 26, 2013

How to import .lar file

Liferay content (pages, child pages, portlets, permissions) could be backup and then restore.

1. Go to > Control Panel > Portal > Sites

Monday, December 23, 2013

How to export/backup Site pages as .lar file

Say for example, I have a site in Liferay called "My New Site".
In this site, I created many pages, child pages, etc.
and also put in all my portlets into all these pages,
and also permissions for all the pages, and portlets.

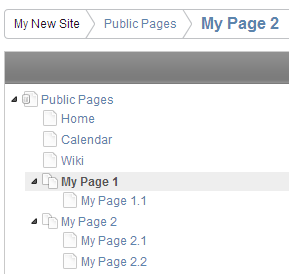
Below is my site pages hierarchy.

Friday, December 20, 2013

Date Format with <p:calendar />

There are 2 ways to define date format for <p:calendar />
1. locale
2. pattern

Option 1: locale

Simply pass in the desired locale.
<p:calendar
    value="#{bean.dateValue}"
    locale="en_US" />

available locales could be found at LocalePlanet.


Option 2: pattern


passed in desired date pattern
<p:calendar
    value="#{bean.dateValue}"
    pattern="dd/MM/yyyy" />

some sample java date patterns
PatternOutput
dd/MM/yyyy20/12/2013
dd/MM/yy20/12/13
d/M/yyyy20/12/2013
d/M/yy20/12/13
dd/MMM/yyyy20/Dec/2013
dd-MM-yyyy20-12-2013
MMM d, yyyyDec 20, 2013
yyyy/MM/dd2013/12/20
EEE, dd MMM yyyyFri, 20 Dec 2013
EEE, dd/MMM/yyyyFri, 20/Dec/2013

more java date pattern could be tested at Online SimpleDateFormat Test.


Done!!

Tuesday, December 17, 2013

HTML5 support in <p:inputText /> with "type" attribute

There is a type attribute in <p:inputText /> component.
And there are few options for the type, which is text (default), number, email, color, etc.

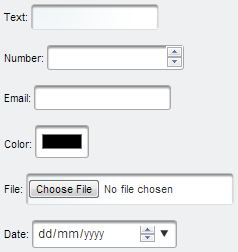
Below is the code and screenshot for different type of <p:inputText />

Text: <p:inputText type="text"></p:inputText>

Number: <p:inputText type="number"></p:inputText>

Email: <p:inputText type="email"></p:inputText>

Color: <p:inputText type="color"></p:inputText>

File: <p:inputText type="file"></p:inputText>

Date: <p:inputText type="date"></p:inputText>


Done!!

Saturday, December 14, 2013

How to update specific cell/component in dataTable

When I tried to update a specific cell or component in dataTable.
<p:commandButton id="btn"
 value="Update DataTable"
 update=":form:dataTable:0:input1" />

Hit the following Exception,
javax.faces.FacesException: Cannot find component with identifier ":form:dataTable:0:input1" referenced from "form:j_idt41:btn"

This error could be solved with jQuery selector.
<p:commandButton id="btn"
    value="Update DataTable"
    update="@(:input[id=form\\:dataTable\\:0\\:input1])" />


Done!!

Wednesday, December 11, 2013

How to add Role with Liferay Portal Client

To create Role in Liferay programmatically, one of the possible way is through Liferay Portal Client and its' web service.

Pre-requisite: Setup Liferay Portal Client
Related:
- Add Liferay user with Portal Client

1. Create Liferay service locator
RoleServiceSoapServiceLocator locator = new RoleServiceSoapServiceLocator();
RoleServiceSoap roleService = locator
    .getPortal_RoleService(new URL("http://" + screenName + ":"
    + password + "@" + liferay_server_ip
    + ":" + liferay_server_port + "/api/secure/axis/Portal_RoleService"));

2. Add new Liferay Role
RoleSoap newrole = roleService.addRole(
    "myRole",                                            // name,
    new String[] { "en_US", " en_GB" },                  // titleMapLanguageIds,
    new String[] { "my role name us", my role name  gb },// titleMapValues,
    new String[] { "en_US", " en_GB" },            // descriptionMapLanguageIds,
    new String[] { "us description","gb description" },  // descriptionMapValues,
    1);        // role type. 1=regular, 2=site, 3=organization

3. verify created role
    i) login as Liferay Administrator
   ii) Goto > Control Panel > Portal > Roles
  iii) Check whether new Role display is the listing.

Sunday, December 8, 2013

How to create Role in Liferay

"A role is a collection of permissions. A role can be applied to a user or group of users. It can even be applied to a Site or an Organization."

Steps to create role in Liferay:
1. Login to Liferay as Administrator.

2. Go to > Control Panel > Portal > Roles > Add

Friday, December 6, 2013

How to add User with Liferay Portal Client API

In previous post: Accessing Liferay Web Service with Liferay Portal Client demonstrated how to setup Liferay Portal Client and access available Liferay web services.
The demonstrated sample is to retrieve Liferay user.
And now is the time to show how to add a new Liferay user through Liferay Portal Client.

1. initiate the user service
UserServiceSoapServiceLocator locator = new UserServiceSoapServiceLocator();
UserServiceSoap service = locator
 .getPortal_UserService(new URL(
 "http://username:password@localhost:8080/api/secure/axis/Portal_UserService"));

2. add user to Liferay
UserSoap user = service.addUser(
 1L,                // companyId,
 false,             // autoPassword,
 password,          // password,
 confirmPassword,   // confirmPassword,
 false,             // autoScreenName,
 screenName,        // screenName,
 emailAddress,      // emailAddress,
 0L,                // facebookId,
 "",                // openId,
 null,              // locale,
 firstName,         // firstName,
 null,              // middleName,
 lastName,          // lastName,
 0,                 // prefixId,
 0,                 // suffixId,
 true,              // male,
 1,                 // birthdayMonth,
 1,                 // birthdayDay,
 1999,              // birthdayYear,
 null,              // jobTitle,
 groupIds,          // groupIds,
 organizationIds,   // organizationIds,
 roleIds,           // roleIds,
 userGroupIds,      // userGroupIds,
 false,             // sendEmail,
 new ServiceContext());

3. initial user status is no status, change the user status to ACTIVE
user = userService.updateStatus(user.getUserId(), 0);


Done!!

Tuesday, December 3, 2013

Liferay remote deployment

Remote deployment allowed Liferay Administrator to install a plugin from any machines instead of just from the server machine.

This feature has been available since Liferay 4. but removed from Liferay 6.
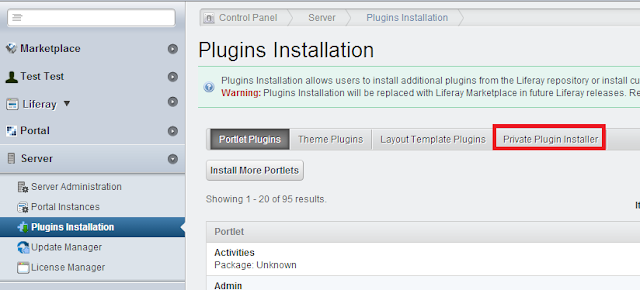
This feature could be enabled by installing the Private Plugin Installer from Liferay Marketplace.

Platform:
Liferay 6.1.1.1 CE GA2

Steps:
1. Download and install Private Plugin Installer.

2. Login to Liferay as Administrator.

3. Navigate to Plugins Installation.
    Go to > Control Panel > Server > Plugins Installation

LinkWithin

Related Posts Plugin for WordPress, Blogger...